Transit Tutorial
Requirements
For simulating public transport (pt, transit) in MATSim, you need:
- a network with links available to public transport vehicles
- a file describing the available public transport vehicles
- a file containing the public transport schedule
- some specific settings in the configuration
In the following, those topics are described in more details. At the end of this tutorial, you find some example files that you can directly use to run a public transport simulation.
Network
Each link has a list of available transport modes. If no modes are specified, the simulation assumes that only "car" is allowed on such links. For public transport, you can add links with modes="train" or modes="bus", for example. It is also possible that links support more than one transport mode, e.g. modes="car,bus".
...
<links capperiod="1:00:00">
  <link id="1" from="1" to="2" length="1000.00" capacity="2000" freespeed="12" permlanes="1" modes="car" />
  <link id="101" from="101" to="102" length="1000.00" capacity="2000" freespeed="12" permlanes="1" modes="bus" />
  <link id="201" from="201" to="202" length="1000.00" capacity="2000" freespeed="12" permlanes="1" modes="train" />
  <link id="301" from="301" to="302" length="1000.00" capacity="2000" freespeed="12" permlanes="1" modes="bus,tram" />
  ...
Public Transport Vehicles
The description of pt vehicles can be split into two parts: In a first part, vehicle types have to be described, specifying how many passengers such a vehicle can transport (Note that the term "vehicle" can refer to multiple vehicles in reality, e.g. a train with several wagons should be specified as one long vehicle with a high number of seats). In the second part, actual vehicles have to listed. Each vehicle has an identifier and is of a previously specified vehicle type.
<vehicleType id="1">
  <description>Small Train</description>
  <capacity>
    <seats persons="50"/>
    <standingRoom persons="30"/>
  </capacity>
  <length meter="50.0"/>
</vehicleType>
<vehicle id="tr_1" type="1"/>
<vehicle id="tr_2" type="1"/>
Public Transport Schedule
In the first part, the stop locations need to be defined, giving each a coordinate, an identifier and a reference to a link in the network. The stop can only be served by vehicles driving on that specified link.
<transitStops>
  <stopFacility id="1" x="1050" y="1050" linkRefId= "11"/>
  <stopFacility id="2" x="2050" y="2940" linkRefId= "24"/>
  ...
Optionally, one can also specify a name for the stop and if other vehicles are blocked when a pt vehicle is waiting at a stop. This last attribute is useful to model e.g. the difference of bus stops, where one bus stop has a bay, while at another stop, the bus has to stop on the actual road.
<transitStops>
  <stopFacility id="1" x="1050" y="1050" linkRefId= "11" name="2nd Street" isBlocking="true" />
  <stopFacility id="2" x="2050" y="2940" linkRefId= "24" name="Main station" isBlocking="false" />
  ...
After the stop locations, the different pt lines, their routes and schedules are described:
<transitLine id="Blue Line">
  <transitRoute id="1to3">
    <transportMode>train</transportMode>
    <routeProfile>
      <stop refId="1" departureOffset="00:00:00"/>
      <stop refId="2" arrivalOffset="00:03:20" departureOffset="00:04:00"/>
      <stop refId="3" arrivalOffset="00:07:20" departureOffset="00:10:00" awaitDeparture="true"/>
      ...
      <stop refId="n" arrivalOffset="00:28:00" />
    </routeProfile>
    <route>
      <link refId="11"/>
      <link refId="398"/>
      <link refId="24"/>
      ...
      <link refId="130"/>
    </route>
    <departures>
      <departure id="01" departureTime="06:00:00" vehicleRefId="tr_1" />
      <departure id="02" departureTime="06:15:00" vehicleRefId="tr_2" />
      ...
    </departures>
  </transitRoute>
</transitLine>
The transportMode describes on which links in the network this line runs, it is interpreted as the "network mode" the transit vehicles will use during the simulation.
The routeProfile describes the stops this route serves, while the route itself describes the series of links in the network the pt driver has to drive along. Note that the complete route, i.e. all links the vehicle drives along, must be listed in the route, and not only the ones where stops are located. All the specified stops should occur along this route in the specified order. Details:
departureOffsetandarrivalOffsetrefer todepartureTimein "departures".
E.g.arrivalOffset="00:03:20"means an arrival at "06:00:00"+"00:03:20", i.e. at "06:03:20". Or at "06:15:00"+"00:03:20", i.e. at "06:18:20".
E.g.departureOffset="00:04:00"means departures at "06:04:00" and "06:19:00".
The resulting arrival and departure times are both used in the pt router: The departure time is the latest time to arrive at the stop, the arrival time is the scheduled arrival time at the destination. If the arrival time is not known, the departure time is used.departureOffsetis required for all stops except the last onearrivalOffsetis optional for all stops except the last oneawaitDeparturespecifies that a transit driver should wait until the scheduled departure time if it is early at the stop. This is useful to ensure connections at larger stops.
The departures list the time, when a vehicle departs at the first specified stop. It also specifies, with which vehicle (defined in the file previously mentioned) the route is served.
Because of the complexity of the transit schedule file format, there is a dedicated tool available that helps to validate a transit schedule.
Configuration
You have to use a mobility simulation that support public transport, currently this is only the so-called "QSim".
<module name="qsim">
  <param name="startTime" value="00:00:00" />
  <param name="endTime" value="30:00:00" />
  <param name="mainMode" value="car,bus,tram,train" />
<module>
It is strongly advised that you specify an end time for the simulation. Sometimes, if agents are too late, they arrive at pt stops way after the last bus/train/... departed and will thus wait at the station forever, and the simulation will also run forever.
You also have to specify which network modes are used by your schedule, and add them to the list of main modes. By default, "car" is the only main mode in the qsim, but when simulation public transport, we want the transit vehicles to be simulated on the links as well. In the example above, I've added bus, tram and train to the list of main modes, but the actual modes may vary based on your schedule.
If you want the agents to perform mode choice, add the mode choice replanning module:
<module name="strategy">
  <param name="ModuleProbability_*" value="0.1" />
  <param name="Module_*" value="ChangeLegMode" />
</module>
[Depending on your version of the code, this may be "ChangeTripMode" instead. And if you are using the config v2 format, the syntax is somewhat different.]
This replanning module needs additional configuration:
<module name="changeLegMode">
  <param name="modes" value="car,pt" />
</module>
[Depending on your version of the code, this may be "changeMode" instead.]
Last but not least, you have to specify the paths to the additional pt-related input files:
<module name="transit">
  <param name="transitScheduleFile" value="transitschedule.xml" />
  <param name="vehiclesFile" value="transitVehicles.xml" />
  <param name="transitModes" value="pt" />
  <param name="useTransit" value="true" />
</module>
Demand / Population
If you enabled mode choice in the configuration, the agents will automatically start exploring the public transport services with the iterations in MATSim. Alternatively, you can also assign the mode "pt" (instead of "car") to agents' legs to tell the agents to use the public transport in the simulation.
Events
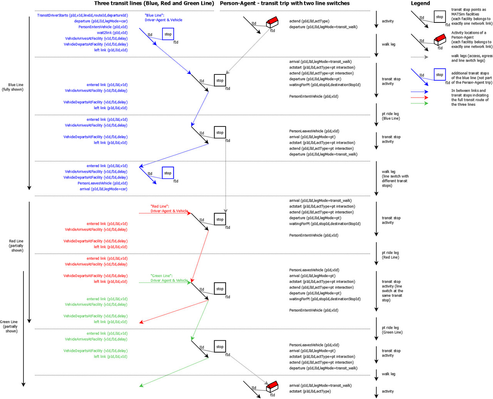
The pt simulation generates additional events related to the public transport:
TransitDriverStarts: This contains information about which driver departs at what time, specifying the transit vehicles the driver steers and along which line and routeVehicleArrivesAtFacility,VehicleDepartsAtFacility: contains information when a transit vehicle arrives and departs at a stop facilityPersonEntersVehicle,PersonLeavesVehicle: contains information about passengers entering and leaving transit vehicles
These events allow you to build your own analyses, e.g. the number of passengers entering and leaving per stop facility, the average load of transit vehicles, etc.
The following figure shows the produced events for a single transit trip with two different line switches. On the left, you find events produced by the three transit lines and on the right the events of the person-agent. (Click on the image to see a larger version.)
Example
The following steps allow you to run the provided example simulation:
- Download the latest MATSim release
- Unzip the release
- Create a directory with the name "
pt-tutorial" within the release-directory. The directory "pt-tutorial" should be on the same level as the "matsim-0.7.0.jar" or the "libs" directory included in the release. - Download the tutorial files and store them all inside the "
pt-tutorial" directory - start a simulation with:
java -Xmx512m -cp matsim-0.8.0.jar org.matsim.run.Controler pt-tutorial/config.xml
- output will be generated into
output/pt-tutorial, so make sure the output-directory exists (create it if missing) and is empty.